About a year ago, I heard about an Indiegogo funding campaign to develop an infrared camera that would attach to a smartphone; it was called the Mu Thermal Camera . I was sure this was a scam, but at the very beginning of this year, Flir announced they were developing essentially the same thing, calling it the Flir One and selling it for under $350; far less than any other infrared camera available today.
My biggest question was whether this camera would be a viable alternative to a traditional infrared camera for home inspectors. As soon as the camera became available for order, I ordered one. It just showed up on Wednesday, 8/20.
The Basics
The Flir One camera attaches to the iPhone 5 and 5s models. It has its own built-in battery, which charges with a standard micro-usb cable. That's nice. Unfortunately, the iPhone can't be charged at the same time, which is quite annoying.
Getting started was easy, even though I've never owned an iPhone. I went to iPhone app store, downloaded and ran the required app, and the software guided me through the rest. Piece of cake.
Size
The Flir One comes with a little black case that the iPhone pops into, which then slides into the camera assembly. It makes the whole package about twice as thick as an iPhone, and a little taller; approximately the height of a Galaxy 4S phone. It's small enough to slip into a pocket, but it's a big lump. That's a lot better than any other IR camera, but the size of my infrared camera has never been a problem for me. When I inspect houses, I bring a big bag of tools into the house with me every time; I have my infrared camera with me whether I plan to use it or not. Making the camera smaller won't change that.
Shape
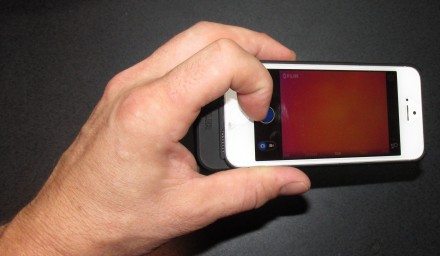
I tried using the Flir One at my last two home inspections, and it felt clumsy. The Flir One is the opposite of ergonomic. You really need two hands to hold the camera and take photos; trying to do it one handed seemed like a sure-fire way to drop the phone and break it. Just like taking photos with a smartphone, you need to touch the screen to capture an image while you're still holding the phone. See below; I have my pointer finger hovering over the "capture" button while I'm holding the phone with my middle finger and thumb.
I'm sure that I would drop and break this phone within a month of using it if I started using it for home inspections, and my understanding is that it doesn't take a much of fall to break the screen on an iPhone. Aftermarket phone cases help to protect the iPhone from falls, but that's not an option when the phone is connected to the Flir One.
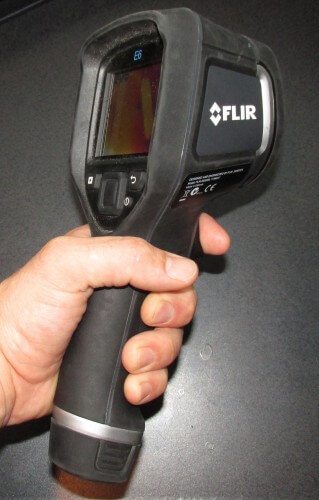
Every other infrared camera I've owned has had a pistol-grip with a trigger for taking photos, making them perfect for one-handed operation. The image below shows my current infrared camera, the Flir E6.
Even if I drop my E6 camera, it won't break. Before buying this camera, one of the Flir reps tossed the camera up into the air and let it fall onto the concrete floor, just to show how durable and rugged they are. I'm sure the Flir One wouldn't tolerate any kind of abuse like that.
Software Options
The Flir One app has very few options. There are the standard color palates like "iron" and "rainbow", as well as a bunch of fairly useless ones like "hottest", "coldest", and "arctic". Emmissivity settings can be changed, the save location of images can be changed, the temperature units can be set to Celsius or Fahrenheit. There's also an option to turn on a spot meter, which displays the temperature of whatever is shown in the middle of the screen. That's about it for options.
Resolution
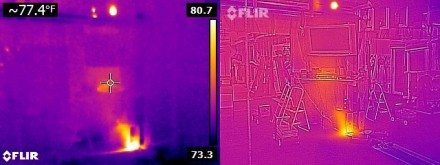
The infrared camera has a resolution of 80×60. Infrared images are combined with optical images, which gives a much clearer image on the screen than you'd get with just an infrared image. Flir calls this Multi-Spectral Dynamic imaging, or "MSX" technology. I have the same technology on my E6 camera, and I absolutely love it. It seems to highlight the edges of objects, which gives you a much better understanding of what you're looking at with the camera. My Flir E6 has an infrared resolution of 160×120, which is about four times the resolution of the Flir One (19,200 pixels vs 4,700). To show the power of MSX technology, take at look at the two images below.
The image on the right looks a heck of a lot better, doesn't it? The funny thing is that the image on the left is from the much higher resolution E6 camera with the MSX technology turned off, while the image on the right is the far lower resolution image of the Flir One. The MSX technology makes the much lower resolution image of the Flir One look far better.
Side note: this makes me contemplate the difference between real value and perceived value.
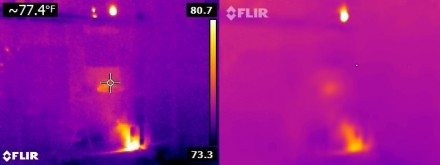
When using the Flir One in well-lit environments like the images above, everything looks great. In the dark… not so much. The image below shows the same two images with the lights turned off. All of the benefit provided by the MSX technology disappears, leaving you with a few indiscernible orange blobs. Using the Flir One in a poorly lit attic would probably be quite frustrating.
I think this test is the most telling, because it shows you what information the Flir One is really giving you. The perceived value is far higher than the actual value when the lights are on.
Usefulness
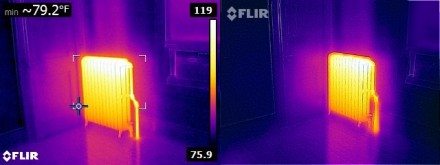
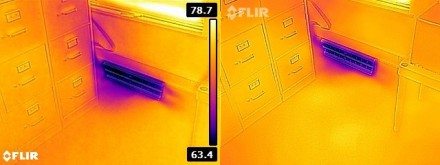
To me, the biggest question is whether this camera could be used to do the same stuff that other infrared cameras can do. Sometimes I use my infrared camera as a time-saving device; I'll quickly scan all of the radiators or supply registers in a house to make sure they're all working properly. It does a fine job of that. The images below again show a side-by-side comparison between an E6 and the Flir One.
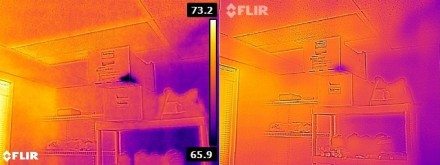
Sometimes infrared cameras can be used to find wet spots. I poured a little bit of water into a cardboard box and took photos, showing how the cold spots compared. The Flir One wasn't great at this, but if you were to really take your time and scan things slowly and up close, you could probably identify the same stuff. It's just not nearly as obvious.
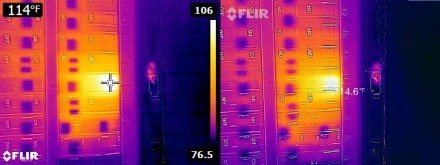
The Flir One also seems to do a fine job of identifying hot spots at electric panels, although this test revealed that the infrared image isn't perfectly blended with the optical image on the Flir One. If you look carefully at the image below, you'll see that the cold tips of the circuit breakers don't match up quite right with the image, probably be. That's annoying.
While I don't find that the exact temperature reading is all that important, it was reassuring to see that the spot temperature readings of the E6 and Flir One were basically identical. In the images above, you'll notice that both cameras identified the temperature of the circuit breaker at 114 degrees F.
Range
The temperature range of the Flir One is 32° F to 212° F.
32° F to 212° F. Huh.
That makes this camera pretty much useless in Minnesota attics during the winter, which is one of the most useful places to take an infrared camera during a home inspection.
Another important thing to note is the operating temperature range of this camera: 32° F to 95° F. Ouch. That almost relegates this camera to the class of "cool toy".
Conclusion
All in all, this is a neat device. If you've always wanted an infrared camera but just haven't wanted to fork out over a thousand dollars for it, this is the camera for you, assuming you already own an iPhone 5.
If you're a home inspector and you've been looking to add an infrared camera to your tool bag, don't buy this camera. The resolution is low, it's clumsy to use, you'll surely break it, and the temperature range is unacceptable. Go with a dedicated infrared camera. I've tested many different infrared cameras, and I've been happy with a resolution of at least 120×120. My advice is to go with the E6, which currently retails for about $2,500.

